BarTender® Technical Support
Installing the Printer with the Seagull Printer Driver
Click to learn more
If you are using your label printer with print software besides manufacturer specific programs like Zebra’s ZDesigner, we recommend you install and use Seagull’s printer driver. This Windows-compatible driver works well for printing from BarTender®, Microsoft Word, and most any other Windows program that can be printed from.
The Seagull print drivers are installable from any BarTender® CD for customers who have ordered BarTender®, but they are available for no cost at Seagull’s Website.
1. If not done already, plug in your printer’s power, connect it to your computer via USB or parallel cable, and power on your printer – For assistance on this step, see the GX430 manual pages in Section B.
2. Use the online download to unpack the Seagull Drivers to your computer and run the Driver Installation Wizard to install your printer.
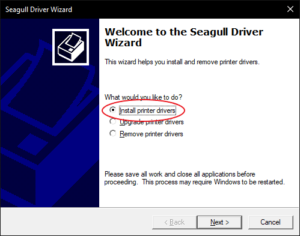
3. Select Zebra as your manufacturer and choose your printer model from this list. If given the option between installing an EPL or ZPL version of your printer, we commonly recommend ZPL. Click Next.
4. Specify on which port your printer is connected to your computer, USB or LPT. Click Next.
5. Name your printer, or leave the default name. Click Next, then click Finish.
6. Once your printer is installed, and ribbon and labels are loaded, please see the section below on calibrating your printer (Page A5).
For instructions on installing the printer using the Windows Add Printer Wizard (rather than the Seagull Driver Install Wizard), please see Page D6 under out troubleshooting section.
Note: If Windows automatically installed your printer upon connection, it is likely to have used the Zebra or other manufacturer driver, and we recommend following the steps above to re-install or replace your printer driver with the Seagull version.
Using the Seagull Printer Driver
Click to learn more
Seagull’s printer driver for Zebra printers offers many user-friendly settings adjustments – including print speed, print direction, sensor settings, and printhead heat settings. As well as the ability to send helpful commands to the printer such as Run Calibration and Reset to Factory Defaults.


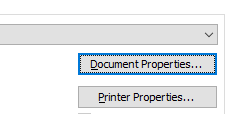
The easiest way to access the driver to adjust settings is through your Print Prompt – that is, the screen you see where you specify the number of labels to print. Click the “Document Properties” button on this page.
You can also access these settings by right clicking on your printer in your Windows Printer Menu and selecting “Printing Preferences”. Regardless of the way you access the driver settings you will bring up another pop-up where printer settings can be adjusted. Some, but not all, of the settings you can adjust are listed below – starting with the most commonly used:
Adjusting the Print Heat and Darkness
Click to learn more
“Print head heat”, “Darkness”, and “Intensity” are all different terms for the amount of energy the printer is told to use to transfer ribbon ink onto your label stock. Often, the default heat setting is not sufficient to gain a quality print, especially on polyester labels. Fortunately, Seagull’s printer driver allows you to adjust the heat under the “Options” tab in “Document Properties” (See previous page on how to access the driver settings).
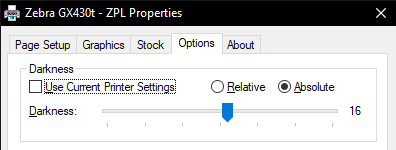
Here, you have a slider that goes from 0 to 30 as a heat adjustment. Electronic Imaging Materials, Inc. recommends you run various tests with different heats, and choose the lowest heat setting that gives you a print quality you are happy with.
Note: You will have to uncheck the box that reads “Use Current Printer Settings” to be able to adjust the darkness slider. EIM also recommends using the “Absolute” option rather than “Relative” for consistent printing. This option won’t be available for TSC printers.
Adjusting the Printer Speed
Click to learn more
“Print head heat”, “Darkness”, and “Intensity” are all different terms for the amount of energy the printer is told to use to transfer ribbon ink onto your label stock. Often, the default heat setting is not sufficient to gain a quality print, especially on polyester labels. Fortunately, Seagull’s printer driver allows you to adjust the heat under the “Options” tab in “Document Properties” (See previous page on how to access the driver settings).
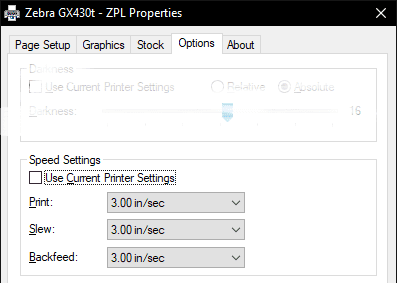
Also on the “Options” tab of your Seagull Printer Driver, you can adjust the speed that your printer runs. This will most often be used to try to solve calibration or print quality issues.
Adjusting the Media Type
Click to learn more
Zebra printers will retain setting information until they are factory reset, or until those settings are over-written with new ones. The Seagull Printer Driver allows you to “Use current printer settings” with your label format, or over-write them with new ones.
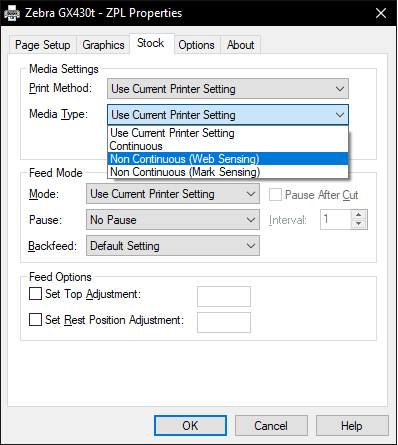
Most labels are printed using the “Web Sensing” option. This means the printer looks for gaps between labels to know where to print. If you have specially made labels with a mark on the back for sensing, you would choose the “Mark Sensing” option. Under the “Print Method” menu, you can choose Thermal Transfer or Direct Thermal. If you are using print ribbon, then your print method is Thermal Transfer. If you are printing without ribbon on special Direct Thermal labels, then Direct Thermal would be your print method.
Once you have installed your roll of labels and ribbon into your desktop printer, often the printer will need to be calibrated to this new stock. When a printer is properly calibrated and ready to print, the green light on top should be solid, and pressing the feed button should feed exactly one label at a time from your printer. If the printer does not feed just one label, it likely needs to be re-calibrated. There are two ways to calibrate the GX & GK Printer. One way is through the Seagull Printer Driver, and one way is using the top feed button on the printer.
Calibrating the Printer Using the Feed Button
Click to learn more
The desktop printers can be sent commands by using the top feed button. This is done by various “Flash Sequences” that are sent by holding the top button down for a certain amount of time. Please refer to page D3 for more details on flash sequences. To send a calibrate command to the printer, hold the feed button down on the printer. The green light will first flash once, then flash twice. If you release the button after the green light flashes twice, a few labels will feed from the printer and it will re-calibrate to your label stock.
Calibrating the Printer Using the Printer Driver
Click to learn more
Bring up your “Printer Properties”, either by browsing to it through your Printers and Devices menu in Windows, or by clicking the “Printer Properties” button in your BarTender print prompt.
Under the “Tools” tab, there is a button that reads “Action”. Clicking that button will offer a variety of commands, including “Run Calibration”. Clicking that option will send a calibrate command to your printer.
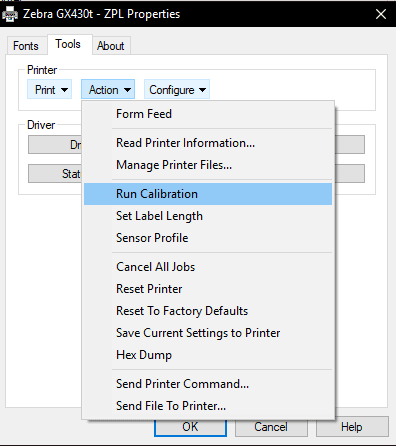
Should you need to clear out settings or start fresh, the “Reset to Factory Defaults” is a good option to choose, and will also run a calibration as part of the reset.