Don’t let label layout and the idea of ordering labels scare you. The Label Experts at Electronic Imaging Materials, Inc. can easily help you define not only the right label material, but the right label size and label format to fit your application and printing requirements.
> Want a move condensed version? Check out this infographic!
Label Layout
A typical label or tag has a top, a bottom and two sides―that is unless it is round or oval shaped. Label measurements in the US are figured in terms of inches to synchronize with production and printing equipment made here in the States. If necessary, we will convert label metric dimensions to inches.
As you look at a label, converters like EIM often describe what you call the label width in terms of the “across the web” dimension. It may help to compare a label “web” to a bolt of woven cloth, where the roll is measured by its web width. Usually the label width “across” is the longest dimension of the label to make designing and printing easier―especially if you are including a lot of text or a barcode. NOTE: For circles or ovals, you should look for the diameter or widest dimension tip to tip for the width “across the web.”
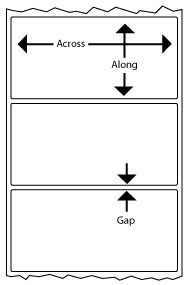
We call the label height (top to bottom) the “along the web” direction which describes the way the labels feed through printing equipment. While this dimension is often less that the width across, there are some times where you simply have to have a taller/longer label. For instance, certain small printers only have narrow print heads, so labels must be made that rotate the width and length. Fortunately, label design software like Seagull’s® BarTender® let you easily switch settings between landscape and portrait printing, just like Word® documents, so you can still print your text or barcodes across the widest part of your labels.
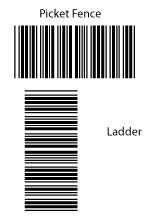
The only word of caution we would make involves high-resolution barcodes. If you are printing a barcode across the web, you should have no problem printing in what is called the “picket fence orientation” that makes the bars of your code look like a fence. However, if you need to print your barcodes along the web, then flipping the barcode orientation to a “ladder-style barcode” may not be as successful. You will need to test your materials and printer to see how you can maximize your print quality.
What we have described so far pertains to roll-form labels, but these same rules of thumb generally hold true for sheet-form laser and inkjet labels since sheets often start off in rolls. Roll form labels can be cut to print one label at a time or in multiples across, only dependent on how wide your printer allows. An advantage to sheet form labels (8.5” x 11”, 8.5 x 14” etc.) is that you can print complete sheets of labels at one time with several labels “across” the web or sheet and several labels “along” the sheet or down. You also should not have to contend with the barcode orientation issues.
When thinking of multiple labels, we will need to consider whether we want “gaps” or spaces between labels or have them “butted” together with no gaps. It has been found that labels with rounded corners tend to be easier to remove from a label liner. At the same time, they generally are harder to remove after being applied to a surface. Labels with round corners seem to have a more attractive appearance and are less apt to flag up. Converting labels with round corners usually requires adding gaps between labels.
Some people like to use printers with “butt cutters” that let them use continuous, non-die cut labels that rely on a straight blade in the printer for cutting between labels. Sheet-form labels also lend themselves well to square cornered labels that conserve space by simply cutting square corners side to side and top to bottom.
Watch for our next “Label Lingo” article where we will go into more detail about label gaps.
If there is something you would like to learn more about involving label design, contact The Label Experts.
